


In this article
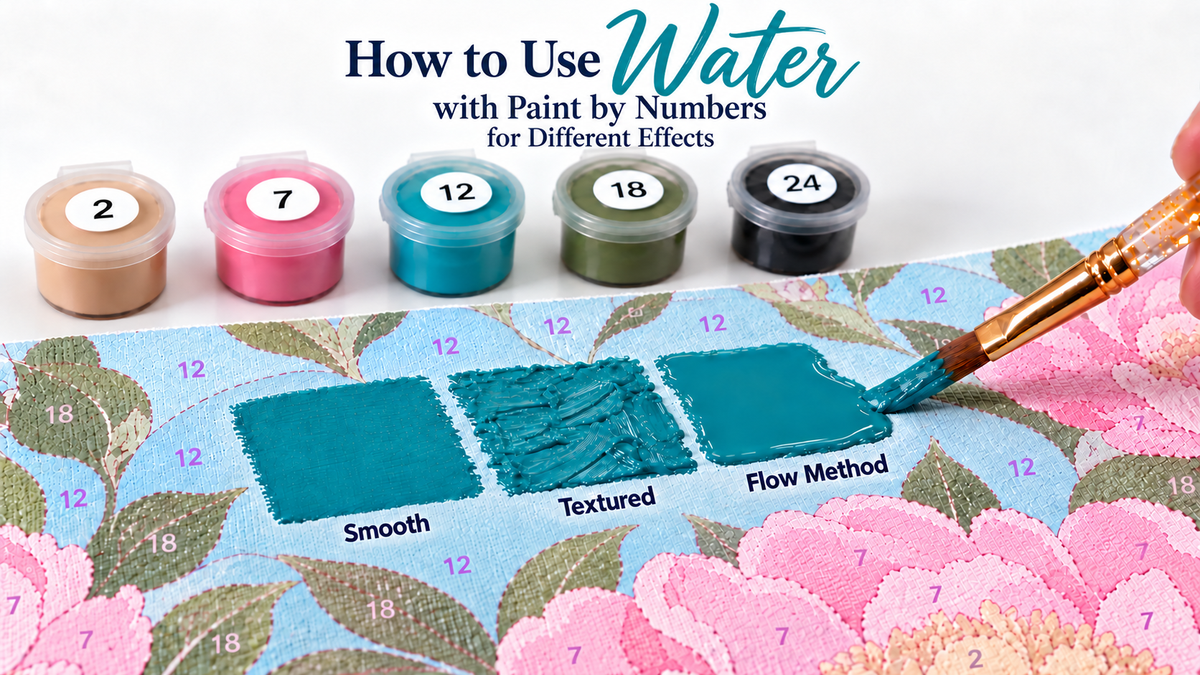
You can use water with paint by numbers to rinse brushes or thin acrylic paint that needs easier spreading. Paint that already works comfortably may need no added water. A smooth coat, gently stacked texture and a runny fill need different handling. Our black, beige and green paint comparisons show why easier brush movement needs to be judged alongside dried coverage and edge control.
The painting comparisons were carried out by PaintEasy team members using our kit paints. We compared black, beige and green on the same canvas with the same brush, assessing application and dried results.
Do You Use Water with Paint by Numbers
Yes, you can add water to paint by numbers acrylic paint when its consistency needs adjusting. You can also use water to rinse and lightly dampen a brush. Water in the paint and water carried by the brush affect handling differently, so check both before changing the mixture.

Water on the Brush and Water in the Paint
A freshly rinsed brush carries water into its first strokes. If those strokes look pale or spread too far but later ones become easier to control, blot and reload the brush before changing the paint.
Brush softness, spring and head size affect how much water it carries and how it moves the paint. Soft, absorbent bristles may carry more moisture; a firmer brush can help move thicker paint. A pointed round reaches small corners, while a flat or filbert suits broader fills. Natural or synthetic hair alone does not tell you how a brush will behave.
A reservoir water brush supplies water from its barrel during painting. Squeezing increases the flow and can thin paint at the tip even when nothing has been added to the pot. Its moisture control differs from a regular brush that has been rinsed and blotted.
For consistent handling, rinse, blot away excess water and reshape the tip. Use fresh water for mixing. When a stroke becomes unexpectedly watery, check the brush moisture before changing the paint.
Check the Paint Before Adding Water
Stir any separated liquid back into otherwise usable paint. Remove a dried skin rather than mixing its fragments into the soft paint below. Try the original paint on spare canvas with a suitable brush and enough paint on the bristles.
If it drags, check the brush and its load first. If it spreads well but leaves the number visible, inspect the dried coverage before thinning it. Persistent rubbery pieces or a hardened lump need the checks in the troubleshooting section below.
How Much Water to Add to the Paint
Start with the original paint and add water only when easier spreading is needed. Small water additions suit smooth brushwork, while the Flow Method uses a runnier mixture containing acrylic thinner and water.

Water Ratios and the Results After Drying
| Mixture | Paint : PaintEasy acrylic thinner : Water | Colors tested | Coverage after drying |
|---|---|---|---|
| Paint and water only | 1:0:2 | Black, beige and green | Numbers fully hidden in 0 of 3 tested colors |
| Paint with PaintEasy acrylic thinner and water | 1:1:2 | Black, beige and green | Numbers fully hidden in 3 of 3 tested colors |
The PaintEasy team compared 2 mixtures across 3 colors: black, beige and green. After drying, printed numbers were fully hidden in 0 of 3 tested colors (0%) with the 1:0:2 mixture, compared with 3 of 3 tested colors (100%) with the 1:1:2 mixture. Ratios are paint : PaintEasy acrylic thinner : water. These percentages describe this small comparison only, not a general coverage guarantee.
Small water additions are measured as paint to water by volume: 1:0 is original paint, while 1:0.25 and 1:0.5 are possible adjustments when needed. For the runny comparison, we use three-part ratios throughout: paint to acrylic thinner to water. The water-only group was 1:0:2; the group using PaintEasy acrylic thinner was 1:1:2.
We compared black, beige and green paints using the same canvas and brush. Increasing water made the brush easier to move, but wetter fills spread more readily at the edges and took longer to dry. Debris landing in the wet paint could also disturb a wider area. Easier movement alone did not give us the best working mixture.
Add Water in Small Measured Amounts
Take a small working portion and keep the main pot closed. Measure paint and water with the same volume unit. Add water in smaller portions and mix thoroughly until you reach the selected ratio.
Keep the working portion uniform as you adjust it. Stir and try a short stroke after each small addition, stopping when the paint spreads comfortably and stays inside the shape. A dropper helps deliver water, but measured volume establishes the ratio.
A Little Water for Smooth Coverage
For flat painting, use the smallest water addition that improves spreading while preserving coverage and control. There is no need to separate outlining from filling: control the pressure and angle of the brush to lay down an even coat. Start with the original paint and adjust only when it needs easier movement.
A Smooth Fill in Large and Small Areas
For a broad area, use a flat or filbert that fits inside the shape. Work in manageable sections, joining their edges while still workable. If early strokes spread well and later strokes turn scratchy, reload before adding water. Leave a tacky layer to dry when further brushing starts pulling it up.
For small cells, use a pointed brush or the narrow edge of a small flat. Guide paint into corners with short strokes, keeping enough on the brush without a bead of liquid at its tip. A broad-area mixture may need a smaller water addition for a tiny, pointed shape.
Check the dried fill for gaps, unfilled corners, spills across outlines and unwanted brush marks. Adjust the next working portion according to the problem you see.
Does Adding Water Make Paint More Transparent
Yes, adding water can make a coat more transparent, especially when it leaves less original paint over the same area. A small addition does not always cause a visible loss of coverage.
Water adds no pigment. Equal volumes of a more diluted mixture contain less original paint, although easier spreading may help fill gaps between strokes. Distinguish bare patches from a number visible beneath a continuous coat. The first can be an application problem; the second needs stronger coverage.
In our runny comparison, the 1:0:2 water-only mixture could not hide the numbers, while 1:1:2 with PaintEasy acrylic thinner covered them completely in all three tested colors. We have improved the coverage of our lighter kit colors with runny painting in mind. These results apply to the PaintEasy paints and thinner we used. Other brands use different pigment formulations, so the ratio needs its own coverage check; some colors may need number-covering preparation or another coat after drying.
Can You Use Water to Blend the Colors
A small water addition can make wet acrylic colors easier to work together. It does not provide a predictable increase in blending time.
For a sky or gradual shadow, place the colors beside each other in a small working section. Make light strokes across their join with a clean, blotted brush while both remain workable. Remove excess color from the brush so the transition stays where you intended.
If the join becomes tacky and brushing starts lifting paint, pause. Water cannot make fully dried acrylic blendable again. Use fresh paint or an intermediate shade for a dry edge. For a larger gradient, prepare intermediate shades in advance; test smaller sections or a suitable slow-drying medium if needed.
Check the dried transition for streaks, lifted patches and visible numbers. A smooth-looking wet blend still needs sufficient coverage after drying.
Thick Paint for Texture and Brush Marks
Build texture by adding small amounts of paint repeatedly with a gentle touch. Control the brush angle and pressure so each addition keeps its shape. In our stacked-paint applications, the raised marks remained after drying, with no observed leveling, cracking or visible color change.

Build Texture with the Paint You Have
Load a small amount on the tip or edge of the tool. Control the brush angle and use light pressure to place the paint, then lift away. Reload and repeat beside or partly over the previous mark, gradually building the texture without pressing earlier deposits flat. A firm flat or filbert can leave grooves; a small palette knife can place deposits where the cell has enough room.
Follow the form with the deposits, such as a curve along a petal or clustered marks for leaves. Build the selected raised parts gradually and keep their outlines readable. If a new touch shifts or flattens earlier paint, reduce the pressure, adjust the angle or pause before continuing.
We do not recommend leaving kit paint uncovered to thicken it. Uneven exposure to air can produce skins and lumps as different parts dry at different rates. Keep the main pot closed between small working portions and build texture through controlled placement.
Where numbers show between ridges, a covering layer allowed to dry before stacking can provide a base.
Texture can use more paint than a flat coat. If you run short, email support@paintezshop.com. We can send another set of paints for your PaintEasy kit.
What a Little Water Does to the Texture
A little water may help paint that is difficult to place, but add only what is needed to make small, gentle deposits. Stop adjusting once the brush can place paint comfortably and the marks hold their shape.
Judge the texture after drying as well as during application. Side lighting helps reveal raised paint and distinguish its physical shape from a glossy reflection.
Adding Gel or Thickener for More Texture
An acrylic gel or thickener is an optional adjustment if a different consistency is needed. Follow the specific product's directions. A pigment-free gel can change transparency as well as body, so check the color and coverage in a small area first.
Quartz sand is another material used for grainy texture effects. For the raised brushwork described here, paint by numbers can rely on gently stacking the kit paint itself; added texture materials are optional.
Give raised paint time to dry before handling the surface. A dry outer surface does not establish that the thicker paint underneath has dried throughout.
Runny Paint for the Flow Method
In this guide, the Flow Method means outlining a numbered cell with runny paint, filling it immediately while wet and guiding small amounts into a connected, even fill. Short, local movements help control the paint without dragging it across the whole shape.
How Runny Does the Paint Need to Be
For the PaintEasy paints and acrylic thinner in our comparison, the mix we preferred was 1:1:2 paint to PaintEasy acrylic thinner to water by volume. It moved with gentle guidance and provided the coverage described above. This is a working recipe for those materials; other paints and thinners need their own check.
Check the deposit size and brush guidance before changing the mixture. Watch whether it needs repeated brushing, escapes the outline or keeps moving after guiding stops. Beading or retreating from the canvas points to a wetting issue that extra water may not solve.

Fill the Cell and Guide the Edges
Keep the canvas flat and evenly supported on a level surface. Our runny fills were more vulnerable to uncontrolled spreading: the mixture's consistency and the surface's tilt affected where it moved, and neighboring wet colors could bleed together. Work where the adjoining color blocks have dried, and keep the canvas level while the new fill remains wet.
Outline first, then fill immediately while the edge is still wet. Use the same mixture for the interior, or a slightly runnier one. The paint already placed along the boundary can be guided inward to join the fill without pushing outward across the outline.
Follow the direction of each stroke with short, local movements, bringing nearby deposits to an even thickness. In our fills, long drags left brush marks and uneven thickness after drying. Add paint where needed rather than pulling one deposit across a long cell.
Printed outlines are visual guides rather than barriers that contain liquid. Watch whether paint keeps moving after guiding stops. Keep the wet fill undisturbed and avoid tilting the canvas while it dries.
What the Surface Looks Like After Drying
The dried fill makes brush marks, uneven thickness and missed coverage easier to judge. Check the center, border and narrow corners separately. In our application, short, local movements were the more useful way to level the paint than dragging it over a long distance.
If the dried fill has been disturbed or the number still shows, another coat can improve it. Let the first coat dry, then outline and fill again, joining the interior to the wet edge with small movements. Correct the affected area while keeping the same boundary.
If paint has crossed into a neighboring section, our guide to fixing paint by numbers mistakes explains how to rebuild the edge after drying.
Water Compared with Flow Medium and Flow Aid
We used PaintEasy's own acrylic thinner for the 1:1:2 recipe. With our kit paints, it mixed evenly without the visible coarse particles or uneven mixture that can signal poor compatibility. That handling describes the materials we used; a product called thinner is not automatically interchangeable with a flow medium or concentrated Flow Aid.
What Each Product Changes
|
Material |
Main contribution |
Important distinction |
|---|---|---|
|
Water |
Thins without adding pigment or acrylic resin |
Handling can improve while coverage changes |
|
Binder-containing fluid or flow medium |
Adds film-forming acrylic material while changing consistency |
Can also change transparency, sheen and drying |
|
Flow aid or flow improver formulated as a wetting additive |
Changes surface tension and wetting |
Requires its stated dose; it is not equivalent to a binder-containing medium |
Names alone do not establish the formulation. For example, GOLDEN High Flow Medium is an acrylic binder system, while its Airbrush Medium is described as an additive with only a small amount of binder. Check the actual product rather than treating them interchangeably.
None of these additions supplies colored pigment. A binder-containing medium can increase transparency, while a wetting additive's easier spreading does not establish stronger number coverage.
Mix According to the Product Label
Separate any pre-dilution instructions from the amount allowed in the paint. Liquitex Flow-Aid, for example, gives a standard 1:20 concentrate-to-water pre-dilution and a separate limit for adding that prepared solution. Follow the current label for both steps.
The PaintEasy 1:1:2 recipe does not establish a dose for another brand's thinner, medium or concentrated additive. Follow that product's own preparation and addition instructions, including any required pre-dilution.
Storage matters too. Acrylic thinner stored poorly or kept open for too long may leave particles in a runny paint mixture. Check the mixed paint before putting it on the canvas. Additional water does not establish that a grainy mixture has become suitable for a smooth fill.
Compare Similar Flow and the Finished Results
Compare products at the working consistency you need: controlled spreading for a smooth stroke, or gentle movement for the Flow Method. Adjust each within its own directions. Equal additions do not necessarily produce equal flow.
Watch how the mixture initially spreads, responds to a light guiding stroke and enters a pointed corner. If a product cannot give the desired handling within its permitted dose, choose another suitable mixture or method.
Our water-only comparison was 1:0:2, beside 1:1:2 with PaintEasy acrylic thinner, in paint-to-thinner-to-water order. The water-only group could not hide the numbers; the PaintEasy mixture covered them in black, beige and green. Both recipes kept the paint-to-plain-water proportion at 1:2, while the thinner added volume and changed the composition. The result compares the complete recipes.
Compare the dry coverage, edges and sheen as well as the ease of application. Similar movement does not mean identical pigment concentration. When adding another coat, watch for color lifting, streaks or uneven wetting. Choose the mixture that gives the intended finish with manageable corrections.
When the Paint Is Too Thick or Too Watery
Judge consistency against the chosen effect. Paint that holds texture may drag during flat painting, while a useful Flow Method mixture may be hard to control in a tiny cell.
Can Water Fix Paint That Has Dried in the Pot
Water may improve paint that is still soft and can become a smooth paste. It cannot restore fully hardened ordinary acrylic to its original liquid state.
|
Pot condition |
Next step |
|---|---|
|
Thick but smooth and mixable |
Adjust a small separate portion only if it needs easier spreading |
|
Dry skin over soft paint |
Remove the skin and sample the usable paint below |
|
Persistent rubbery pieces or strings |
Check a separate portion; replace affected paint if it remains uneven |
|
Hardened throughout |
Replace the color |
Older paint has lost an unknown amount of water, so no universal recovery ratio applies. Check the dried swatch for roughness, coverage and color against an unaffected same-color sample when available.
What Happens If You Add Too Much Water
Too much water means losing the control, coverage or texture required for the method. Our 1:1:2 PaintEasy mixture is intentionally runny; its usefulness came from the combination of manageable filling and number coverage, rather than easy movement alone.
Watch for uncontrolled travel, a thinner covering layer, uneven deposits or collapsing ridges. First repeat with a properly blotted brush and a smaller load. Excess brush water or too much paint placed at once can resemble a mixture problem. Judge the corrected application after drying rather than assuming failure from a ratio alone.
Fix the Mix and Check It Again
For excess water, gradually add measured amounts of the original same-color paint to restore pigment and binder. A pigment-free gel or thickener can change body without replacing the missing colored paint. If the recipe is unknown or a concentrated additive has been overused, start a fresh measured batch.
Try the corrected mixture on spare canvas before continuing. Check that it solves the original issue without creating another, such as better control but insufficient coverage. Judge the color and surface again after drying.
If the watery coat is already on the painting, let it dry before adding adjusted paint to correct the coverage. Test the dried color match first.
Different Effects in the Same Painting
Separate working portions allow one numbered color to serve different areas. Choose the finish for the shape and its role in the picture, then check how the neighboring finishes work together.
Match the Mix to the Area You Are Painting
Smooth, controlled paint suits small details and even backgrounds. Open cells with room to guide the paint are candidates for the Flow Method. Selected petals or leaves can carry raised marks where they fit the form.
Size alone is not enough. A large cell may narrow to a sharp tip, while a small petal may hold a few deliberate strokes. Test the full shape. Compare different mixtures of the same color after drying, because changes in coverage or sheen can affect how the areas relate.

Combine Smooth Areas Texture and Flow
For a floral design, try a smooth background, flow-filled broad leaves and texture built through small, gentle, repeated deposits on selected foreground petals. Complete covering base layers where needed, finish the fluid areas while the canvas is level, then build the texture gradually. Rinse and blot consistently when switching mixtures.
For flat painting and gently stacked texture, adjoining areas can be worked in sequence while the brush keeps the paint under control. Give runny fills more separation: wait for neighboring colors to dry and keep the canvas level. Preserve the petal's silhouette, the leaf-to-stem join and other details when connecting different finishes.
Look at the dried painting from a normal viewing distance as well as close up. A frontal view shows coverage and color relationships; side lighting reveals relief and sheen. Adjust any marks or color differences that draw attention away from the intended focus.